I first tried to write a Gaussian blur in JavaScript in 2014. The image was 1200x800, the kernel was 9x9, and the implementation was a triple-nested for loop in Canvas2D's getImageData. It took 950 milliseconds per frame and locked the main thread the entire time. A year later I ported it to WebGL with a fragment shader and the same blur took 4 milliseconds — a 240x speedup, on the same hardware, using the same browser. That experience permanently changed how I think about image processing on the web. The CPU is not the right tool for pixel-parallel work. The GPU is, and WebGL has been the standard way to access the GPU from a browser since 2011. This guide is the one I wish I had in 2014. It covers the mental model you need to write fragment shaders, walks through the convolution kernels that power every blur and sharpen and edge-detect, and ends with a real implementation of LUT-based color grading that you can ship in production.
Why GPUs are insanely good at image processing
A modern CPU has 8 to 16 cores, each capable of complex branching, speculative execution, deep cache hierarchies, and out-of-order instruction dispatch. A modern GPU has 2,000 to 10,000 cores, each far simpler than a CPU core but capable of basic arithmetic and memory access. The GPU trades complexity for parallelism. Image processing is the canonical GPU workload. A 12-megapixel image is 12 million pixels. A blur operation is the same computation applied to each pixel independently — the calculation for pixel (100, 200) does not depend on the result for pixel (100, 201). This means the operation is embarrassingly parallel: with 4,000 GPU cores, you can process 4,000 pixels simultaneously, completing the 12-megapixel image in roughly 3,000 core-cycles. Concretely: a 12-megapixel Gaussian blur on a 2024-era laptop CPU takes about 850 milliseconds in pure JavaScript. The same blur on the integrated GPU of the same laptop, via WebGL, takes about 4 milliseconds. That is a 200x speedup, achieved by moving the work to hardware designed for it. A discrete GPU (RTX 4070) does the same blur in under 1 millisecond. WebGL 1.0 shipped in 2011, WebGL 2.0 in 2017. WebGL 2 brought 3D textures, transform feedback, and uniform buffer objects — all useful for image processing. The remaining limitation versus native GPU APIs is that WebGL does not have compute shaders, so any operation that requires scattered writes (writing to arbitrary pixel positions, like histogram computation) has to be expressed as a render pass that writes to a texture. WebGPU, which shipped in Chrome 113 in 2023 and is in Safari Technology Preview, brings compute shaders to the web. For pure image processing (point operations, convolution, color grading), WebGL 2 is entirely sufficient and has near-universal browser support. The economic case for GPU image processing is also strong. A browser-based photo editor that does its work on the GPU can match the performance of native apps, with no install, no server costs, and no upload bandwidth. This is why Photopea, Pixlr, and EditPhotosForFree all use WebGL under the hood. The CPU is reserved for UI, file I/O, and orchestration; the GPU does the actual image work.
The fragment shader mental model
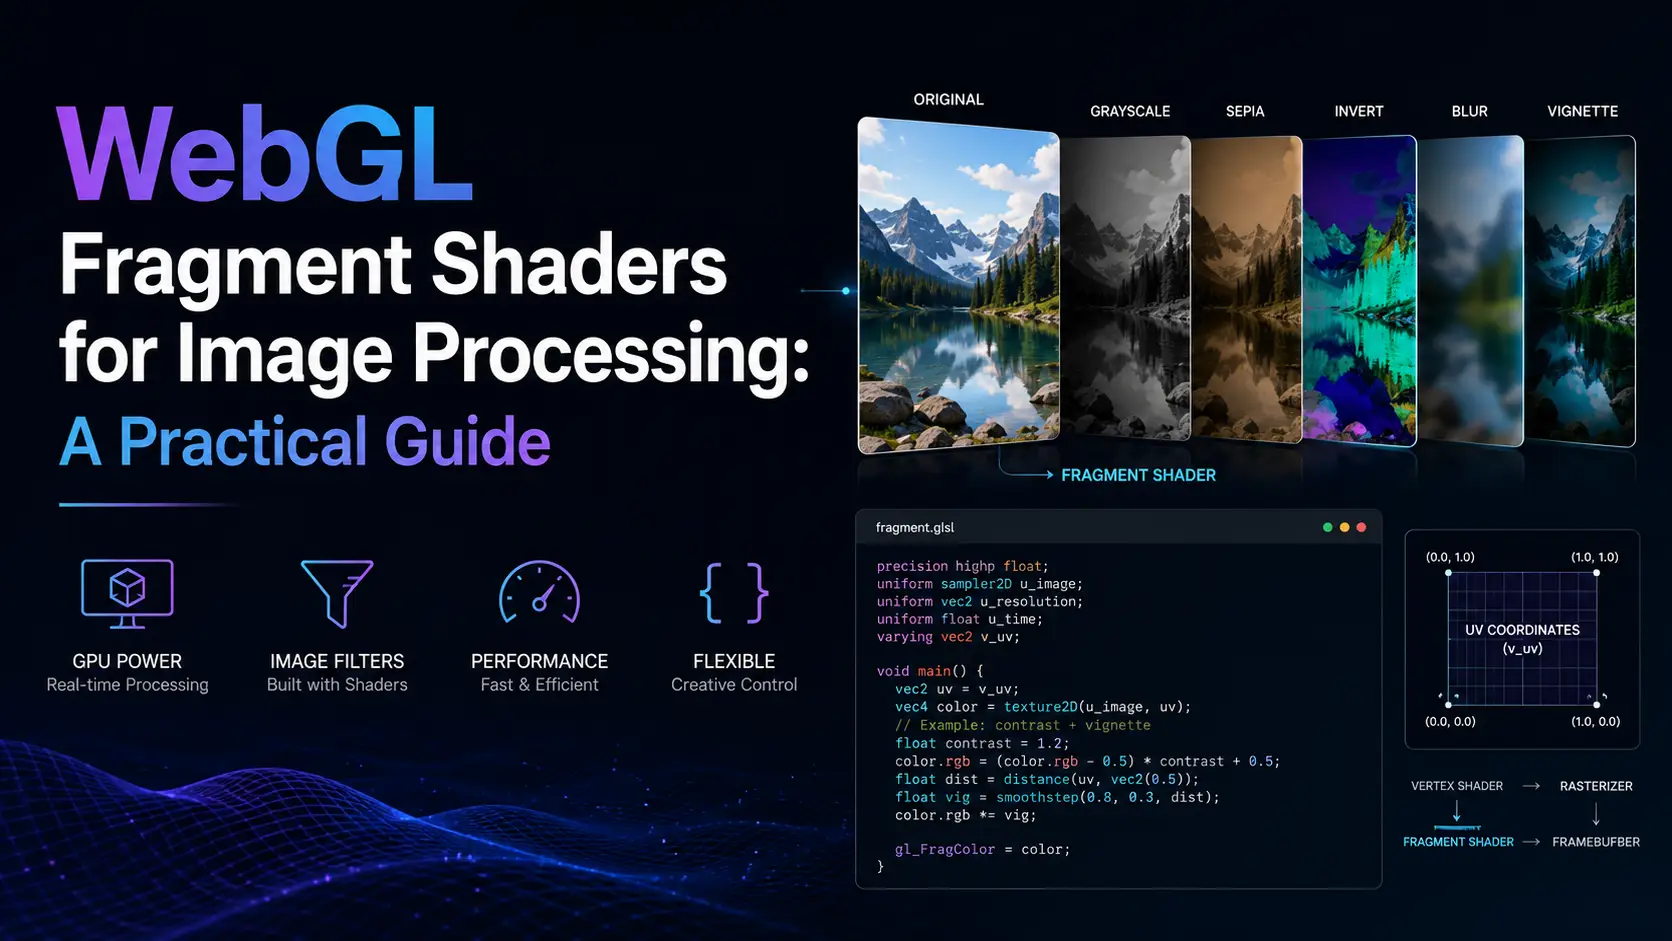
A WebGL program has two shaders: a vertex shader and a fragment shader. The vertex shader runs once per vertex of the input geometry and outputs a position. The fragment shader runs once per output pixel and outputs a color. For image processing, the geometry is always a fullscreen quad (two triangles covering the screen), so the vertex shader is trivial and the entire interesting work is in the fragment shader.
The fragment shader's job is to compute the color of one pixel. It receives inputs in the form of uniforms (constants for the entire draw call, set from JavaScript), varyings (values interpolated from the vertex shader — typically texture coordinates), and samplers (read-only access to textures). It outputs gl_FragColor (WebGL 1) or a value written to an out variable (WebGL 2).
The simplest possible image-processing fragment shader is a passthrough that samples the input texture and outputs the sampled color. The GLSL looks like this:
precision highp float;
uniform sampler2D u_image;
varying vec2 v_texCoord;

void main() {
  gl_FragColor = texture2D(u_image, v_texCoord);
}
Every other image-processing shader is a variation on this pattern. A brightness adjustment multiplies the sampled color by a uniform scalar. A contrast adjustment interpolates between the sampled color and a constant based on a uniform. A hue shift converts RGB to HSV, modifies H, converts back. A blur samples multiple neighboring pixels and averages them.
The mental shift required, coming from CPU programming, is that you do not write a loop over pixels. The GPU runs your shader once per pixel for you. Your shader is the body of an implicit loop. This is why fragment shaders feel weird to CPU programmers at first — you cannot iterate over the image, you can only describe what to do at one pixel.
Uniforms are how you parameterize the shader. A Gaussian blur shader takes a uniform for the radius and a uniform for the direction (horizontal or vertical, for separable blur). A color grading shader takes a uniform sampler2D for the LUT. A vignette shader takes uniforms for the center, radius, and intensity. Uniforms are set from JavaScript with gl.uniform* calls before the draw call, and they are constant for every pixel in that draw call.
Varyings are how you pass per-pixel data from the vertex shader to the fragment shader. For a fullscreen quad, the vertex shader just passes through the texture coordinates, and the fragment shader receives them interpolated. This is what tells the fragment shader which pixel of the input texture to sample. In WebGL 2, you can also use the gl_FragCoord built-in to get the integer pixel coordinate of the current fragment, which is useful when you need to do procedural generation rather than sampling a texture.
Performance-wise, the things that matter are texture fetches (each texture() call is a memory read from GPU memory, which is slow), register pressure (more temporary variables means fewer fragments can run in parallel on each core), and branch divergence (if/else in a shader causes both branches to execute for pixels that take either path, halving throughput).
Convolution kernels: from identity to Gaussian blur
A convolution kernel is a small matrix of weights that determines how each output pixel is computed from its neighbors. For a 3x3 kernel, the output pixel is the weighted sum of the 9 surrounding input pixels, with weights given by the kernel. The math is simple; the variety of effects you can achieve by varying the weights is enormous. The identity kernel is [[0,0,0],[0,1,0],[0,0,0]] — only the center pixel contributes, so the output equals the input. This is the trivial case. A box blur is [[1/9,1/9,1/9],[1/9,1/9,1/9],[1/9,1/9,1/9]] — equal weight on all 9 neighbors, producing a uniform average. Box blur is fast but produces visible square artifacts. For higher quality, increase the kernel size to 5x5 or 7x7, but the cost grows quadratically. A Gaussian blur uses weights derived from the Gaussian function. For a 5x5 kernel with sigma=1, the weights are approximately [[1,4,7,4,1],[4,16,26,16,4],[7,26,41,26,7],[4,16,26,16,4],[1,4,7,4,1]] / 273. Gaussian blur is what most image editors call 'blur' — it produces a smooth result without box artifacts. The Gaussian kernel is separable, which is the most important optimization in image processing. A 2D Gaussian blur with kernel size N is equivalent to two 1D Gaussian blurs (horizontal then vertical), each with kernel size N. This reduces the per-pixel work from N^2 texture fetches to 2N texture fetches — a 5x speedup for a 5x5 kernel, a 13x speedup for a 13x13 kernel. Every serious Gaussian blur implementation uses separable kernels. A sharpen kernel is [[0,-1,0],[-1,5,-1],[0,-1,0]] — it accentuates the difference between a pixel and its neighbors. Push the center weight higher (to 9, with -1 in a larger diagonal pattern) for stronger sharpening. Sharpen is just a negative blur added back to the original, which is why most sharpening tools have an 'amount' slider that controls the blend. Edge detection uses the Sobel operator: two 3x3 kernels, one for horizontal gradient and one for vertical gradient. The output is the magnitude of the gradient, which is high at edges and low in flat regions. Sobel is the basis of most edge-detection and feature-extraction pipelines. An emboss kernel is [[-2,-1,0],[-1,1,1],[0,1,2]] — it produces a sculpted, bas-relief look by combining a directional gradient with the original. Push the diagonals harder for a stronger effect. The GLSL for a generic 3x3 convolution is straightforward: sample the 9 neighboring pixels, multiply each by its kernel weight, sum the results. For larger kernels, the same pattern extends. The key optimization is to use a uniform array for the kernel weights and a loop in the shader, rather than hardcoding each sample. For separable kernels (Gaussian, box, triangle), always do two passes. The first pass blurs horizontally into an intermediate texture; the second pass blurs the intermediate vertically into the final result. The cost is 2N texture fetches per pixel instead of N^2, which for a 25x25 kernel is a 12x speedup. Edge cases at image borders matter. The standard options are to clamp the texture coordinates to the edge (replicating edge pixels), wrap around (tiling), or reflect (mirroring). For photographic image processing, clamp-to-edge is almost always correct. Set it with gl.texParameteri(gl.TEXTURE_2D, gl.TEXTURE_WRAP_S, gl.CLAMP_TO_EDGE).
Color grading with LUTs in GLSL
A LUT (lookup table) is a precomputed mapping from input colors to output colors. Color grading with LUTs is how every film and TV show is graded — DaVinci Resolve, Baselight, and every other pro grading tool use LUTs as the primary color manipulation mechanism. LUTs work in WebGL too, and the implementation is surprisingly approachable. There are two kinds of LUT. A 1D LUT maps each input channel independently: given input R, output R' = f(R). 1D LUTs can express per-channel curves (gamma, contrast, levels) but cannot express cross-channel effects (turning red toward orange, shifting blue toward teal). A 1D LUT is just 256 entries per channel, so 768 floats total. A 3D LUT maps arbitrary input RGB to arbitrary output RGB. The input space is sampled on a 3D grid, typically 17x17x17 or 32x32x32 or 64x64x64. At each grid point, the LUT stores the output RGB. To look up an arbitrary input color, the GPU trilinearly interpolates between the 8 surrounding grid points. 3D LUTs can express any color transformation, including cross-channel shifts, hue rotations, and film stock emulation. In WebGL 1, 3D textures are not supported, so 3D LUTs are packed into a 2D texture as a tile grid. A 32x32x32 LUT becomes a 1024x32 texture, where each row is a slice of the 3D LUT at a fixed blue value. The shader computes which tile to sample based on the input blue value, then samples the tile at the (red, green) position. This is the standard trick used by every WebGL 1 LUT implementation. In WebGL 2, 3D textures are native. You upload the LUT as a 3D texture and sample it with texture(lut3d, vec3(r, g, b)). The GPU does the trilinear interpolation in hardware, which is faster than the manual 2D-texture approach and produces identical results. The GLSL for 3D LUT sampling in WebGL 2 is trivial: vec3 graded = texture(u_lut, inputColor).rgb;. That is the entire color grade. The actual work is in authoring the LUT, which is done in DaVinci Resolve, Photoshop, or Affinity Photo, exported as a .cube file, parsed in JavaScript, and uploaded to the GPU as a 3D texture. Authoring your own LUTs is straightforward. Start with an identity LUT (a 32x32x32 cube where output = input). Apply color adjustments in DaVinci Resolve or Photoshop (curves, color wheels, hue vs hue, etc.) until you have the look you want. Export the adjustments as a LUT. The LUT now bakes in everything you did, in a single 32x32x32 cube of RGB values. Applying the LUT in WebGL is one texture fetch per pixel — about as cheap as image processing gets. Common LUTs you can download and use: Kodak 2383 (film emulation), Rec.709 to Rec.2020 (color space conversion), Bleach Bypass (desaturated contrast look), Teal & Orange (the classic Hollywood look). Free LUT libraries exist at rocketstock.com and luts.iwltbap.com. Most are .cube files, which are simple text format and easy to parse. The performance of a 3D LUT grade is dominated by the single texture fetch. On a modern GPU, a 12-megapixel LUT grade runs at about 1 millisecond. You can stack 10 LUTs (for different regions of the image, masked) and still hit 60 FPS. This is why browser-based color grading tools like Color.io and FilmicPro can match the responsiveness of native grading applications.
Performance: texture fetches, register pressure, MRT
Once your shader works, performance is the next concern. The four main performance levers in WebGL image processing are texture fetches, register pressure, branch divergence, and render pass count. Texture fetches are the dominant cost in most image-processing shaders. Each texture() call is a read from GPU memory, which is slow compared to ALU operations. A 13x13 separable Gaussian blur does 13 texture fetches per pixel per pass, so 26 fetches total. A 13x13 non-separable blur does 169 fetches per pixel. The difference between 26 and 169 fetches is the difference between 60 FPS and 10 FPS on a 4K image. Mipmaps matter when downsampling. If you are sampling from a texture that is larger than the output (e.g., blitting a 4K image to a 1080p quad), the GPU has to sample multiple texels per output pixel. Without mipmaps, this produces aliasing. With mipmaps, the GPU automatically picks the appropriate mipmap level and the result is clean. Always generate mipmaps for textures you will downsample: gl.generateMipmap(gl.TEXTURE_2D). Texture format matters for bandwidth. RGBA8 (4 bytes per pixel) is the default and works for most cases. RGBA16F (8 bytes per pixel) is needed for HDR work where intermediate values can exceed [0,1]. RGBA32F (16 bytes per pixel) is rarely needed and halves memory bandwidth. For LUT textures, RGB8 is sufficient and saves 25% bandwidth over RGBA8. Register pressure is the second most common performance issue. Each fragment shader invocation uses a certain number of GPU registers (temporary variables). The more registers a shader uses, the fewer fragments can run in parallel on each compute unit. If your shader uses too many registers, the GPU will spill to memory, which is catastrophic for performance. The fix is to reduce the number of temporary variables in the shader — reuse variables, avoid holding many intermediate results simultaneously, and prefer smaller kernels. Branch divergence is a subtler issue. GPUs execute fragments in groups (typically 32 fragments per group on NVIDIA, 64 on AMD). If fragments in the same group take different branches of an if/else, the GPU executes both branches for all fragments, masking out the results that do not apply. This means if/else in a shader is not free even when one branch is empty. For image-processing shaders, prefer math over branching: instead of if (x > 0.5) y = a; else y = b;, use mix(b, a, step(0.5, x)). The math version is branch-free and runs at full speed on all fragments. Multiple render targets (MRT) let you write to multiple textures in a single render pass. This is useful for algorithms that produce multiple outputs (e.g., deferred rendering, which outputs position, normal, albedo, and material in a single pass). For image processing, MRT is rarely needed, but it can speed up multi-output algorithms like separable filter decomposition with intermediate results. Profiling tools are essential for serious WebGL work. Spector.js (browser extension) captures a single frame and shows every draw call, every texture upload, every shader. The WebGL Inspector (similar) does the same with a different UI. For GPU-side profiling, the WebGL timer query extension (EXT_disjoint_timer_query) lets you measure GPU time for specific draw calls. Chrome's Performance tab shows JavaScript time but not GPU time, so for GPU-bound work the timer query is the only way to know what is actually happening. The 16ms budget for 60 FPS is tighter than it sounds. A typical image-processing pipeline has 5-10 shaders, each doing 5-20 texture fetches. At 4K resolution (8.3M pixels), 10 shaders averaging 10 fetches each is 830M texture fetches per frame. At 100 gigabytes per second of GPU memory bandwidth (typical for an integrated GPU), fetching 830M RGBA8 texels is about 3.3 gigabytes, which takes 33 milliseconds. That is over budget. The fix is to reduce shader count, reduce kernel size, or reduce resolution (render at 1080p and upscale).
WebGL vs WebGPU: when to switch
WebGPU shipped in Chrome 113 in May 2023 and has been in development in Safari and Firefox since. By 2026, it has reached roughly 75% browser support — enough for production use in many projects, but not enough to replace WebGL for general-audience work. The question of when to switch from WebGL to WebGPU is one of the most consequential technical decisions for new browser-based image processing projects. WebGPU's headline advantage over WebGL is compute shaders. WebGL fragment shaders can only write to the current pixel being processed; they cannot scatter writes to other positions. This makes algorithms that require scattered writes (histogram computation, sort, particle simulation with spatial hashing) impossible to implement efficiently. WebGPU compute shaders can write anywhere, which unlocks these algorithms and many others. For image processing specifically, compute shaders make operations like adaptive histogram equalization, bilateral filtering with arbitrary kernel shapes, and non-local means denoising practical in the browser for the first time. WebGPU's second advantage is performance. The WebGPU API is lower-overhead than WebGL — fewer state changes, fewer validation calls, more direct mapping to modern GPU APIs (Direct3D 12, Vulkan, Metal). In benchmarks, WebGPU matches or slightly beats WebGL on simple workloads, but on complex workloads with many draw calls, the gap can be 2-3x. This is because WebGPU's command buffer model batches work more efficiently than WebGL's immediate-mode API. WebGPU's third advantage is modern feature access. WebGPU exposes features that WebGL cannot, including bind groups (more efficient uniform management), storage buffers (read-write buffers for arbitrary data), and explicit synchronization primitives. For complex image processing pipelines, these features simplify the code significantly. WebGL's advantage is universal support. Every browser released since 2013 supports WebGL 1. Every browser since 2019 supports WebGL 2. If you write for WebGL today, your code runs everywhere. WebGPU is still missing on older iOS devices, on Firefox stable (it is behind a flag as of 2026), and on some enterprise browsers. For consumer-facing applications, this matters. The pragmatic recommendation for image-processing work in 2026 is to use WebGL 2 for general-audience work and WebGPU for projects that can target modern Chrome or Edge (corporate internal tools, games on gaming-focused sites, developer tools). The libraries are converging — Babylon.js and Three.js both support WebGPU with a WebGL fallback, so you can write code that runs on both. For raw WebGL/WebGPU without a library, write for WebGL 2 first and add WebGPU as an enhancement. The transition will likely be complete by 2028. By then, WebGPU will have universal support and WebGL will be in maintenance mode. But for the next two years, WebGL is still the right choice for most projects. The techniques in this guide (fragment shaders, convolution kernels, LUTs, MRT) are identical in WebGPU — only the API surface changes. Learning WebGL now is not wasted effort; the mental model transfers directly to WebGPU when you make the switch.
Conclusion
WebGL fragment shaders are the right tool for almost every image-processing task on the web. The performance gap between CPU and GPU is too large to ignore, and the programming model — once you internalize that the shader is the body of an implicit per-pixel loop — is genuinely elegant. The techniques covered here (convolution kernels, separable filters, LUT-based color grading, MRT, profiling) are the foundation of every serious browser-based image editor. If you are building one, learn these fundamentals before reaching for an abstraction library. Once you understand the raw WebGL, libraries like regl and TWGL become productivity multipliers rather than black boxes. And when WebGPU becomes universally supported, the same mental model transfers directly — compute shaders just let you express scattered-write algorithms that WebGL cannot. The GPU is not going away; it is becoming more important every year as browsers take over more of the work that used to belong to native apps.