I spent years treating PixiJS filters as magical black boxes. The BlurFilter blurred. The DisplacementFilter displaced. Custom filters were for people who understood GLSL, which I did not. Then in 2021 I needed a CRT effect for a retro game — barrel distortion, scanlines, RGB chromatic aberration, vignette — and no off-the-shelf filter did what I wanted. I had to write my own. That project taught me that PixiJS filters are not magical at all. They are GLSL fragment shaders with a small amount of plumbing for render targets and uniforms. If you can write a fragment shader, you can write a PixiJS filter. This guide walks through the filter pipeline, builds five real filters (grayscale, brightness/contrast, CRT, displacement glitch, multi-pass bloom), and explains the performance considerations that determine whether your filter ships at 60 FPS or 15 FPS. Everything here works with PixiJS 7 and 8.
The PixiJS filter pipeline explained
A PixiJS filter is a fragment shader plus the render-target plumbing needed to apply that shader to a sprite or container. Understanding the plumbing is essential because it determines what your shader can and cannot do efficiently. When you apply a filter to a sprite or container, PixiJS does the following: it calculates the bounds of the filtered content (the filter area), pads the bounds to accommodate the filter's padding property (used by blur to avoid edge artifacts), creates an offscreen render target of that size, renders the filtered content to the offscreen target, runs the filter shader on the target, and renders the result back to the main framebuffer at the original location. The filter shader receives four built-in uniforms: uSampler (the offscreen render target as a texture), filterArea (vec4 with x, y, width, height of the filter area in pixels), filterClamp (vec4 with the clamping rectangle for texture coordinates), inputSize (vec2 with the size of the input texture in pixels), and outputFrame (vec4 with the output rectangle). These uniforms let your shader reason about pixel coordinates, which is essential for effects like scanlines or vignettes that depend on position. The filter's vertex shader is usually the default PixiJS filter vertex shader, which sets up a fullscreen quad with appropriate texture coordinates. You rarely need to write a custom vertex shader for image-processing filters. The only exception is when you need to pass custom varying data to the fragment shader, which is rare. Filter padding matters for effects that sample outside the filter area. A blur with radius 8 needs to sample 8 pixels outside the sprite's bounds, so it needs 8 pixels of padding. Without padding, the blur samples transparent pixels at the edges, producing dark borders. Set padding via filter.padding = 8. The default is 0, which is wrong for any effect that samples neighbors. Multi-filter stacks work by chaining render targets. If a sprite has filters [blur, colorMatrix, displacement], PixiJS renders the sprite to target 1, applies blur to produce target 2, applies colorMatrix to produce target 3, applies displacement to produce target 4, and renders target 4 back to the framebuffer. Each filter in the stack adds a render pass — three filters = three extra passes = three times the render cost. Filter resolution can be reduced for performance. filter.resolution = 0.5 renders the filter at half resolution and upscales the result. This is 4x faster (half width, half height) and is visually acceptable for blur and bloom filters. For detail-critical filters (color grading, displacement), keep resolution at 1.0. Filter blend modes control how the filter result is composited back to the framebuffer. The default is normal blend (overwrite). For effects like bloom, you want additive blend (the bloom adds light to the original). Set blendMode = PIXI.BLEND_MODES.ADD on the filter to enable additive compositing. Antialiasing on filtered content is tricky. PixiJS's MSAA applies to the main framebuffer, not to filter render targets. If your filter area has hard edges (a circle sprite, for example), the edges may look aliased after filtering. The fix is to enable smoothing on the filter's render target via filter.multisample = PIXI.FILTER_MULTISAMPLE.bilinear (or higher for more samples), but this is expensive.
Writing your first custom filter: grayscale and brightness
The PIXI.Filter constructor takes three arguments: vertexSrc (optional, defaults to the standard filter vertex shader), fragmentSrc (the fragment shader source as a string), and uniforms (an object describing the uniforms your shader uses). The fragment shader is GLSL, written as a string in JavaScript. The simplest useful filter is grayscale. The standard grayscale conversion is a luminance-weighted average of RGB: gray = 0.299 * r + 0.587 * g + 0.114 * b. These weights come from ITU-R BT.601 and account for the human eye's greater sensitivity to green. The GLSL is: precision highp float; varying vec2 vTextureCoord; uniform sampler2D uSampler; void main() { vec4 color = texture2D(uSampler, vTextureCoord); float gray = dot(color.rgb, vec3(0.299, 0.587, 0.114)); gl_FragColor = vec4(gray, gray, gray, color.a); } In JavaScript: const grayscaleFilter = new PIXI.Filter(null, grayscaleFragmentSrc); sprite.filters = [grayscaleFilter]; That is a complete, working custom filter. The first time I got this working in 2021, I was genuinely surprised at how little code was required. A brightness/contrast filter adds two uniforms. Brightness is an additive offset to RGB; contrast is a multiplicative scaling around 0.5. The GLSL: uniform float brightness; uniform float contrast; void main() { vec4 color = texture2D(uSampler, vTextureCoord); color.rgb += brightness; color.rgb = (color.rgb - 0.5) * contrast + 0.5; gl_FragColor = color; } In JavaScript: const bcFilter = new PIXI.Filter(null, bcFragmentSrc, { brightness: 0.0, contrast: 1.0 }); To update uniforms at runtime: bcFilter.uniforms.brightness = 0.1; bcFilter.uniforms.contrast = 1.2; Uniform types matter. PixiJS's uniforms object takes plain JavaScript values that are automatically converted to GLSL types: number becomes float, [x, y] becomes vec2, [x, y, z] becomes vec3, [x, y, z, w] becomes vec4, and a PIXI.Texture becomes sampler2D. For matrices, use Float32Array. A hue-shift filter requires converting RGB to HSV, shifting H, and converting back. The conversion math is well-known but tedious — about 30 lines of GLSL. I keep a hue-shift shader in a snippet library because I rewrite it every year and always forget the exact formulas. The key trick: in GLSL, you can compute HSV from RGB using a series of mix() and step() calls without any if/else, which keeps the shader branch-free. A useful pattern is to write your filter shaders in separate .glsl or `.ts?raw` files imported as strings, rather than embedding them as JavaScript string literals. This gives you syntax highlighting, linting, and easier editing. With Vite, use import fragmentSrc from './filter.frag?raw'; With Webpack, use the raw-loader. With esbuild, use the text loader. One gotcha: GLSL ES 1.0 (WebGL 1) does not support loops with dynamic bounds. If your shader has a for loop with a variable bound, you have to use a constant upper bound and break inside the loop. GLSL ES 3.0 (WebGL 2) removes this restriction. PixiJS 8 supports WebGL 2 by default, but check your target browser support before relying on WebGL 2 features.
Multi-pass rendering and ping-pong buffers
Some effects cannot be done in a single pass. Bloom is the canonical example: you need to extract the bright parts of the image, blur them, and composite back over the original. The blur step itself is two passes (horizontal and vertical for separable Gaussian). So bloom is at least four passes: bright extract, horizontal blur, vertical blur, composite. Each pass reads from one render target and writes to another, in a pattern called ping-pong. Ping-pong rendering uses two render targets, alternately reading from one and writing to the other. Pass 1 reads from A, writes to B. Pass 2 reads from B, writes to A. Pass 3 reads from A, writes to B. And so on. The two targets swap roles each pass, hence the name. In PixiJS, the easiest way to do multi-pass is to stack filters on a container. Each filter in the stack is one pass, and PixiJS handles the ping-pong internally. For a bloom, you would create three filters: a brightness-extract filter, a blur filter (which is itself two passes internally), and a composite-additive filter. Stack them on a container with blend mode ADD on the final filter. For more control, use a custom multi-pass filter. PixiJS 8 introduces the Pipe system, which lets you write a custom render pipe that issues multiple draw calls. This is advanced but gives you full control over render target management. The built-in BlurFilter is implemented this way — it is one filter that does two passes internally. A simpler approach for many effects is to use multiple sprites. Render the original sprite normally. Render a duplicate sprite with the bright-extract and blur filters applied, with blend mode ADD. The duplicate contributes the bloom on top of the original. This avoids writing a multi-pass filter entirely, at the cost of doubling the sprite work. Ping-pong in raw WebGL (without PixiJS) is more code but gives you full control. Create two framebuffers, each with an attached texture. Bind framebuffer A as render target, bind texture B as input, draw. Then bind framebuffer B as render target, bind texture A as input, draw. The pattern is symmetric and easy to wrap in a helper function. Render target size matters. If your filter chain is applied to a 1024x1024 sprite, each pass uses a 1024x1024 render target. Four passes = four render targets = 16 MB of GPU memory at RGBA8. For mobile GPUs with limited memory, consider reducing render target size for blur passes — a 512x512 blur target upscaled to 1024x1024 looks acceptable for bloom and uses 1/4 the memory and bandwidth. Filter resolution is PixiJS's way of controlling render target size. filter.resolution = 0.5 renders the filter at half resolution. This is 4x faster (1/2 width times 1/2 height = 1/4 pixels) at the cost of some blur sharpness. For bloom, resolution 0.25 is often acceptable. For displacement, resolution 1.0 is required to avoid visible pixelation. A specific multi-pass example: a glitch effect with three passes. Pass 1: horizontal displacement based on row, with random offset per row. Pass 2: vertical color channel split (red shifted left, blue shifted right). Pass 3: scanline and vignette overlay. Implemented as three stacked filters, this runs at 60 FPS on modern hardware. Implemented as a single custom multi-pass filter, it runs at 90 FPS — the savings come from avoiding PixiJS's per-filter overhead.
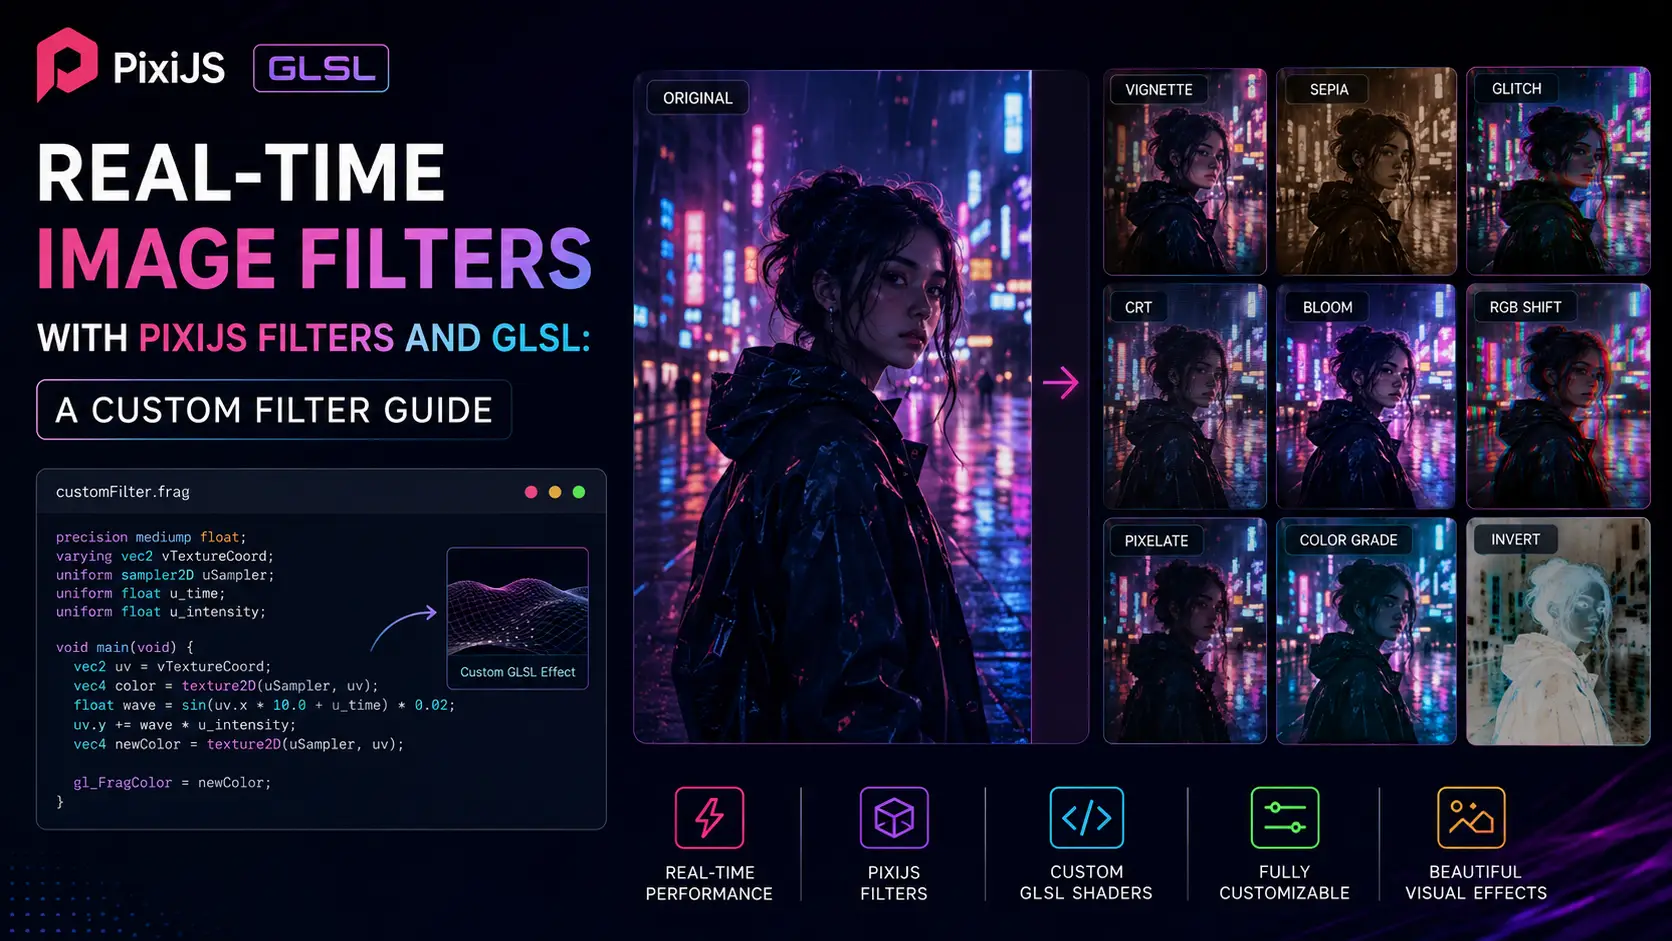
Displacement, CRT, VHS, and glitch effects
Displacement mapping is one of the most useful filter techniques. The idea: sample the input texture at a position offset by a second texture (the displacement map). The displacement map's red and green channels encode the X and Y offsets. This lets you distort an image arbitrarily by controlling the displacement map. PixiJS has a built-in PIXI.DisplacementFilter that takes a displacement sprite as input. The displacement sprite can be any Sprite with a texture. Common choices: a Perlin noise texture for water-like ripples, a gradient texture for lens distortion, a hand-painted map for character warping. Animate the displacement sprite by moving or scaling it, and the filtered sprite ripples in response. A CRT effect is a classic retro-gaming look. It has four components: barrel distortion (the screen bulges outward), scanlines (dark horizontal lines every other pixel), RGB chromatic aberration (red, green, blue channels are offset slightly), and vignette (corners are darker). Each is a few lines of GLSL. Barrel distortion in GLSL: convert the texture coordinate to centered coordinates (-1 to 1), apply the distortion formula (distortedCoord = coord * (1 + k * dot(coord, coord))), convert back to texture coordinates, sample the texture. The constant k controls the strength of the distortion; 0.1 to 0.3 is the typical range. Sample outside the [0,1] range will produce transparent or clamped pixels at the edges, so set filter.padding to 0.2 or so to crop those out. Scanlines: multiply the output by a sine wave based on the pixel Y coordinate. float scanline = sin(vTextureCoord.y * inputSize.y * 3.14159) * 0.1 + 0.9; color.rgb *= scanline; The factor 3.14159 produces one scanline per pixel row; multiply by a higher value for more scanlines. RGB chromatic aberration: sample the red, green, and blue channels separately with slightly different texture coordinates. vec2 offset = vec2(0.002, 0.0); float r = texture2D(uSampler, vTextureCoord + offset).r; float g = texture2D(uSampler, vTextureCoord).g; float b = texture2D(uSampler, vTextureCoord - offset).b; gl_FragColor = vec4(r, g, b, 1.0); Increase the offset for stronger aberration. Vignette: darken the corners by multiplying by a factor that decreases with distance from the center. float dist = length(vTextureCoord - 0.5); float vignette = smoothstep(0.8, 0.4, dist); color.rgb *= vignette; Combine all four into a single shader for performance. The CRT effect as a single shader costs about 1 millisecond per megapixel — acceptable for most use cases. As four separate filters, it costs about 4 milliseconds — still acceptable but leaves less headroom. A VHS effect is similar: noise overlay (sample a noise texture and add it to the image), color shift (rotate all colors slightly toward green or magenta), tracking jitter (offset the entire image vertically by a small random amount that changes slowly), and head-switching artifacts (a horizontal band where the image is doubled). Each is a few lines of GLSL. The noise texture can be generated procedurally in the shader using a hash function for self-contained effects. A glitch effect typically combines row-based displacement (random horizontal offset per row, controlled by a uniform that changes randomly each frame), block displacement (random rectangular regions are shifted), and color channel split. The trick is to make the glitch feel random and sudden rather than continuous — a glitch that is always on is just a different look, not a glitch.
Filter performance: when to use them, when to avoid
Filters are expensive. Each filter adds at least one render pass, allocates render targets, and consumes GPU bandwidth. The question is not 'can I do this with a filter' but 'should I do this with a filter.' The answer depends on the effect, the frame budget, and the alternatives. Use a filter when: the effect requires per-pixel computation that cannot be done by changing sprite properties, the effect needs to apply to a group of sprites uniformly, or the effect is dynamic and changes every frame. Examples: color grading (LUT), Gaussian blur, displacement, CRT, glitch, bloom. Avoid a filter when: the same effect can be achieved by changing sprite properties. A color tint is cheaper via sprite.tint than via a color-matrix filter. A position offset is cheaper via sprite.x than via a displacement filter. A blend mode is cheaper via sprite.blendMode than via a custom blend shader. Always check if the simple property-based approach works before reaching for a filter. Filter area is the single biggest performance factor. A filter applied to a 100x100 sprite runs in 0.5 milliseconds; the same filter applied to a 1920x1080 stage runs in 60 milliseconds. Apply filters to specific sprites or containers, not to the stage. If you need a global effect, render the scene to a texture at a smaller size and filter that. Filter resolution multiplies the savings. A 1080p stage filtered at resolution 0.5 is equivalent to a 540p filter area, which is 4x faster than resolution 1.0. For blur and bloom, resolution 0.25 is often acceptable and is 16x faster. Always use the lowest resolution that looks acceptable. Static filters can be baked. If you have a sprite that does not move and has a filter that does not change, render the filtered sprite to a texture once and use the texture as a new sprite. This eliminates the per-frame filter cost entirely. PixiJS's GenerateTexture function does this: const filtered = PIXI.Assets.generateTexture(spriteWithFilter). Combining filters into a single shader is the most effective optimization for complex looks. Three stacked filters (color matrix, vignette, scanlines) cost three render passes. A single custom filter that does all three costs one render pass. The single-filter version is 3x faster. The trade-off is shader complexity — a combined shader is harder to write and debug, and changing one effect requires re-editing the combined shader. Filter pooling reuses render targets across frames. PixiJS does this automatically via the FilterPool, but the pool can be tuned. For apps with predictable filter sizes, pre-warming the pool by running the filters for a few frames during loading avoids the first-frame stutter of pool growth. Mobile considerations: mobile GPUs have 2-5x less fill rate than desktop GPUs. A filter that runs at 60 FPS on a 4K desktop monitor may run at 15 FPS on a 1080p mobile device. For mobile, reduce filter resolution aggressively, minimize filter count, and prefer baked textures for static effects. Test on the slowest device you intend to support — a 2019-era Android phone is a reasonable lower bound for general mobile support. A useful rule of thumb: budget 4 milliseconds for filters at 60 FPS. That is roughly two 1-millisecond filters at full resolution, or four at half resolution. If your filter budget exceeds 4 milliseconds, you will struggle to hit 60 FPS on mobile. At 120 FPS, your filter budget is 2 milliseconds — essentially one cheap filter. For 120 FPS targets, prefer baked textures and minimal dynamic filtering.
Conclusion
PixiJS filters are GLSL fragment shaders with render-target plumbing. Once you internalize that, the entire filter API makes sense: filters are expensive because they are extra render passes; uniforms are how you parameterize them; multi-pass effects are how you do bloom and glitch; resolution and padding are the dials that trade quality for performance. The five filters built in this guide (grayscale, brightness/contrast, CRT, displacement, bloom) cover most of what you will ever need. The techniques (ping-pong, baking, combining shaders) are the optimization toolkit. The most important habit is to profile every filter you add — a 1-millisecond filter on desktop can be a 10-millisecond filter on mobile, and the only way to know is to test. Filters are powerful, but the difference between a 60 FPS and a 20 FPS PixiJS app is almost always filter discipline. Use them where they earn their cost, prefer simple alternatives where they exist, and bake static effects to textures whenever possible. Do that, and your PixiJS app will run smoothly on hardware ranging from a 2019 Android phone to a 2026 flagship desktop.