PixiJS is a fast, flexible 2D rendering engine that uses WebGL to draw graphics at high performance. In this tutorial, you will build a basic image editor from scratch: load an image onto a WebGL canvas, adjust its brightness, contrast, and saturation with real-time filters, apply blur and rotation, crop with masks, undo and redo changes, and export the result as a downloadable PNG or JPG. Every code example uses PixiJS v7.3.2 loaded from a CDN via a script tag — no bundler required. Copy any example into an HTML file and open it in your browser to see it run.
Setup and initialization
Load PixiJS v7.3.2 from a CDN using a script tag. This gives you a global PIXI object. In v7, the Application constructor is synchronous — pass your options directly. The resizeTo option makes the canvas fill a container and auto-resize. The resolution option controls pixel density — use window.devicePixelRatio for crisp rendering on high-DPI screens.
The background color is set via backgroundColor (as a hex number, not a string). The antialias option enables smooth edge rendering. After construction, append app.view (the canvas element) to a DOM container.
<class="hl-attr">class="hl-keyword">script class="hl-attr">src=class="hl-string">"https://cdn.jsdelivr.net/npm/pixi.js@7.3.2/dist/pixi.min.js"></class="hl-attr">class="hl-keyword">script>
<class="hl-attr">class="hl-keyword">script>
  // Create the PixiJS application (v7 — synchronous constructor)
  var app = new PIXI.Application({
    width: 800,
    height: 600,
    backgroundColor: 0x1a1a1a,
    antialias: true,
    resolution: window.devicePixelRatio || 1,
    autoDensity: true
  });

  // Append the canvas to a container
  document.getElementById('canvas-container').appendChild(app.view);
</class="hl-attr">class="hl-keyword">script>
In PixiJS v7, app.view is the canvas element (in v8 it was renamed to app.canvas). app.stage is the root container for all display objects — everything you add to the stage gets rendered. The app.ticker provides a render loop that redraws the canvas on every frame automatically.
Loading and displaying an image
In PixiJS v7, use PIXI.Assets.load() to load images. It returns a Promise that resolves to a Texture. Create a Sprite from that texture, set its anchor to (0.5, 0.5) so it rotates and scales around the center, then add it to the stage. The fitToScreen function calculates a scale that fits the image within the canvas while leaving a small margin.
var sprite = null;

function loadImage(url) {
  PIXI.Assets.load(url).then(function(texture) {
    // Destroy old sprite if it exists
    if (sprite) {
      app.stage.removeChild(sprite);
      sprite.destroy();
    }

    // Create a new sprite from the loaded texture
    sprite = new PIXI.Sprite(texture);
    sprite.anchor.set(0.5);
    sprite.position.set(app.screen.width / 2, app.screen.height / 2);
    app.stage.addChild(sprite);

    fitToScreen();
    applyFilters();
  });
}

function fitToScreen() {
  if (!sprite) return;
  var sw = app.screen.width / sprite.texture.width;
  var sh = app.screen.height / sprite.texture.height;
  sprite.scale.set(Math.min(sw, sh) * 0.9);
}

// Load a sample image to start
loadImage('https://picsum.photos/seed/pixi/800/600');
The anchor property sets the pivot point for the sprite. Setting it to (0.5, 0.5) means the sprite rotates and scales around its center. PIXI.Assets.load() accepts URLs and data URLs directly, so you can load from a server or from a local file via FileReader. Always destroy the old sprite before creating a new one to avoid GPU memory leaks.
Adjustment filters: brightness, contrast, and saturation
PixiJS v7 includes a ColorMatrixFilter that can adjust brightness, contrast, saturation, and hue. You apply filters by setting the filters array on any display object. The filter modifies the rendered pixels in real time using the GPU. Call reset() before applying new adjustments to clear the previous color matrix.
// Create a single reused filter instance
var colorMatrix = new PIXI.ColorMatrixFilter();

// State object to track current adjustments
var editState = {
  brightness: 1, contrast: 1, saturation: 1, hue: 0
};

// Apply all color adjustments to the sprite
function applyFilters() {
  if (!sprite) return;
  colorMatrix.reset();  // clear previous matrix
  colorMatrix.brightness(editState.brightness, false);
  colorMatrix.contrast(editState.contrast, true);
  colorMatrix.saturate(editState.saturation, false);
  colorMatrix.hue(editState.hue, false);
  sprite.filters = [colorMatrix];
}

// Connect to UI sliders
['brightness', 'contrast', 'saturation', 'hue'].forEach(function(key) {
  document.getElementById(key).addEventListener('input', function(e) {
    editState[key] = parseFloat(e.target.value);
    applyFilters();
  });
});
The reset() method clears the color matrix before applying new adjustments. Without it, each call to brightness() or contrast() would stack on top of the previous one, producing unexpected results. The second argument to each method controls whether the adjustment multiplies the existing matrix (true) or replaces it (false).
Blur and rotation
The BlurFilter applies a Gaussian blur to a display object. In v7, the blur amount is set via the blur property. The quality property controls the number of blur passes — higher values produce a smoother result but cost more GPU time. Stack multiple filters by adding them to the sprite.filters array.
var blurFilter = new PIXI.BlurFilter();
blurFilter.blur = 0;
blurFilter.quality = 4;

// Stack blur with the color matrix filter
sprite.filters = [colorMatrix, blurFilter];

// Blur slider
document.getElementById('blur').addEventListener('input', function(e) {
  blurFilter.blur = parseFloat(e.target.value);
});

// Rotation(degrees to radians)
document.getElementById('rotation').addEventListener('input', function(e) {
  var degrees = parseFloat(e.target.value);
  sprite.rotation = (degrees * Math.PI) / 180;
});

// Flip horizontally by negating scale.x
document.getElementById('flip-h').onclick = function() {
  sprite.scale.x = -Math.abs(sprite.scale.x);
};

// Flip vertically by negating scale.y
document.getElementById('flip-v').onclick = function() {
  sprite.scale.y = -Math.abs(sprite.scale.y);
};
Rotation uses radians, not degrees. The formula is radians = degrees * PI / 180. For flipping, negate the scale value on the axis you want to flip. Use Math.abs() to ensure the scale stays positive before negating, so flipping twice returns to the original orientation.
Crop with masks
Cropping in PixiJS uses a Graphics mask or a render-to-texture approach. The mask approach hides pixels outside a region. The render-to-texture approach actually crops the texture, producing a new smaller image. Here is the render-to-texture method used in the image editor — it renders the cropped region to a RenderTexture, then replaces the sprite.
var cropMask = null;

// Crop using a Graphics mask(non-destructive)
function cropCenter() {
  if (!sprite || cropMask) return;
  var b = sprite.getBounds();
  var p = 0.15; // 15% margin on each side
  cropMask = new PIXI.Graphics();
  cropMask.beginFill(0xffffff);
  cropMask.drawRect(
    b.x + b.width * p,
    b.y + b.height * p,
    b.width * (1 - p * 2),
    b.height * (1 - p * 2)
  );
  cropMask.endFill();
  sprite.mask = cropMask;
  app.stage.addChild(cropMask);
}

// Reset crop(show full image)
function resetCrop() {
  if (cropMask) {
    sprite.mask = null;
    cropMask.destroy();
    cropMask = null;
  }
}

document.getElementById('crop-center').onclick = function() {
  saveState(); cropCenter();
};
document.getElementById('reset-crop').onclick = function() {
  saveState(); resetCrop();
};
The mask uses sprite-local coordinates, not screen coordinates. If your sprite is positioned at (200, 100), the mask's (0, 0) starts at the sprite's top-left corner, not the canvas top-left. Always destroy old masks before creating new ones to avoid GPU memory leaks. For a destructive crop that actually resizes the texture, render the cropped region to a PIXI.RenderTexture, then create a new sprite from that texture.
Drag-and-drop image loading
To let users load images by dragging them onto the canvas, listen for dragover and drop events on the container element. When a file is dropped, use FileReader to read it as a data URL, then load it via PIXI.Assets.load(). Also add a file picker button for users who prefer clicking.
// Drag-and-drop on the canvas container
var container = document.getElementById('canvas-container');
container.addEventListener('dragover', function(e) { e.preventDefault(); });
container.addEventListener('drop', function(e) {
  e.preventDefault();
  var file = e.dataTransfer.files[0];
  if (file && file.type.startsWith('image/')) {
    var reader = new FileReader();
    reader.onload = function(ev) { loadImage(ev.target.result); };
    reader.readAsDataURL(file);
  }
});

// File picker button
document.getElementById('load-btn').onclick = function() {
  document.getElementById('file-input').click();
};
document.getElementById('file-input').onchange = function(e) {
  var file = e.target.files[0];
  if (file) {
    var reader = new FileReader();
    reader.onload = function(ev) { loadImage(ev.target.result); };
    reader.readAsDataURL(file);
  }
};
The FileReader API reads the dropped file as a base64 data URL. PIXI.Assets.load() accepts data URLs directly, so you do not need a server. After loading the new texture, reset all filters and crop state to start fresh with the new image.
Undo and redo
Undo and redo work by saving snapshots of the edit state. Before each change, push the current state onto a history array. Undo pops the previous state and restores it. Redo re-applies a change that was undone. Save state on mousedown (before the change) rather than on input (during the change) to capture the state before the user started dragging.
var history = [];
var historyIndex = -1;

function saveState() {
  history.splice(historyIndex + 1);
  history.push({
    brightness: editState.brightness,
    contrast: editState.contrast,
    saturation: editState.saturation,
    hue: editState.hue,
    blur: blurFilter.blur,
    rotation: sprite.rotation
  });
  if (history.length > 50) { history.shift(); } else { historyIndex++; }
}

function undo() {
  if (historyIndex <= 0) return;
  historyIndex--;
  var s = history[historyIndex];
  editState.brightness = s.brightness;
  editState.contrast = s.contrast;
  editState.saturation = s.saturation;
  editState.hue = s.hue;
  blurFilter.blur = s.blur;
  sprite.rotation = s.rotation;
  applyFilters();
}

function redo() {
  if (historyIndex >= history.length - 1) return;
  historyIndex++;
  var s = history[historyIndex];
  editState.brightness = s.brightness;
  editState.contrast = s.contrast;
  editState.saturation = s.saturation;
  editState.hue = s.hue;
  blurFilter.blur = s.blur;
  sprite.rotation = s.rotation;
  applyFilters();
}

// Save state before each slider change
document.querySelectorAll('input[type="range"]').forEach(function(el) {
  el.addEventListener('mousedown', saveState);
});

// Keyboard shortcuts: Ctrl+Z / Ctrl+Shift+Z
document.addEventListener('keydown', function(e) {
  if ((e.ctrlKey || e.metaKey) && e.key === 'z') {
    e.preventDefault();
    e.shiftKey ? redo() : undo();
  }
});
Save state on mousedown (before the change) rather than on input (during the change). This captures the state before the user started dragging the slider. The history array stores plain objects, so it is lightweight. For a production editor, you would serialize the full canvas state including sprite position, rotation, and crop coordinates.
Export and download
In PixiJS v7, use app.renderer.plugins.extract to capture the canvas as an image. The extract.canvas() method returns a Canvas element, which you can convert to a data URL and trigger a download. This renders the sprite with all applied filters at the original texture resolution.
function exportImage(format) {
  var extract = app.renderer.plugins.extract;
  var canvas = extract.canvas(sprite);
  var link = document.createElement('a');
  link.download = 'edited.' + format;
  link.href = canvas.toDataURL('image/' + format, 0.92);
  link.click();
}

// Export buttons
document.getElementById('export-png').onclick = function() {
  exportImage('png');
};
document.getElementById('export-jpg').onclick = function() {
  exportImage('jpeg');
};
In PixiJS v7, the extract plugin is at app.renderer.plugins.extract (in v8 it moved to app.renderer.extract). The canvas() method renders the display object to an HTML Canvas element. Use toDataURL() to get a base64 string, then create a temporary link element to trigger the download. The quality parameter (0 to 1) only applies to lossy formats like JPEG — PNG is always lossless.
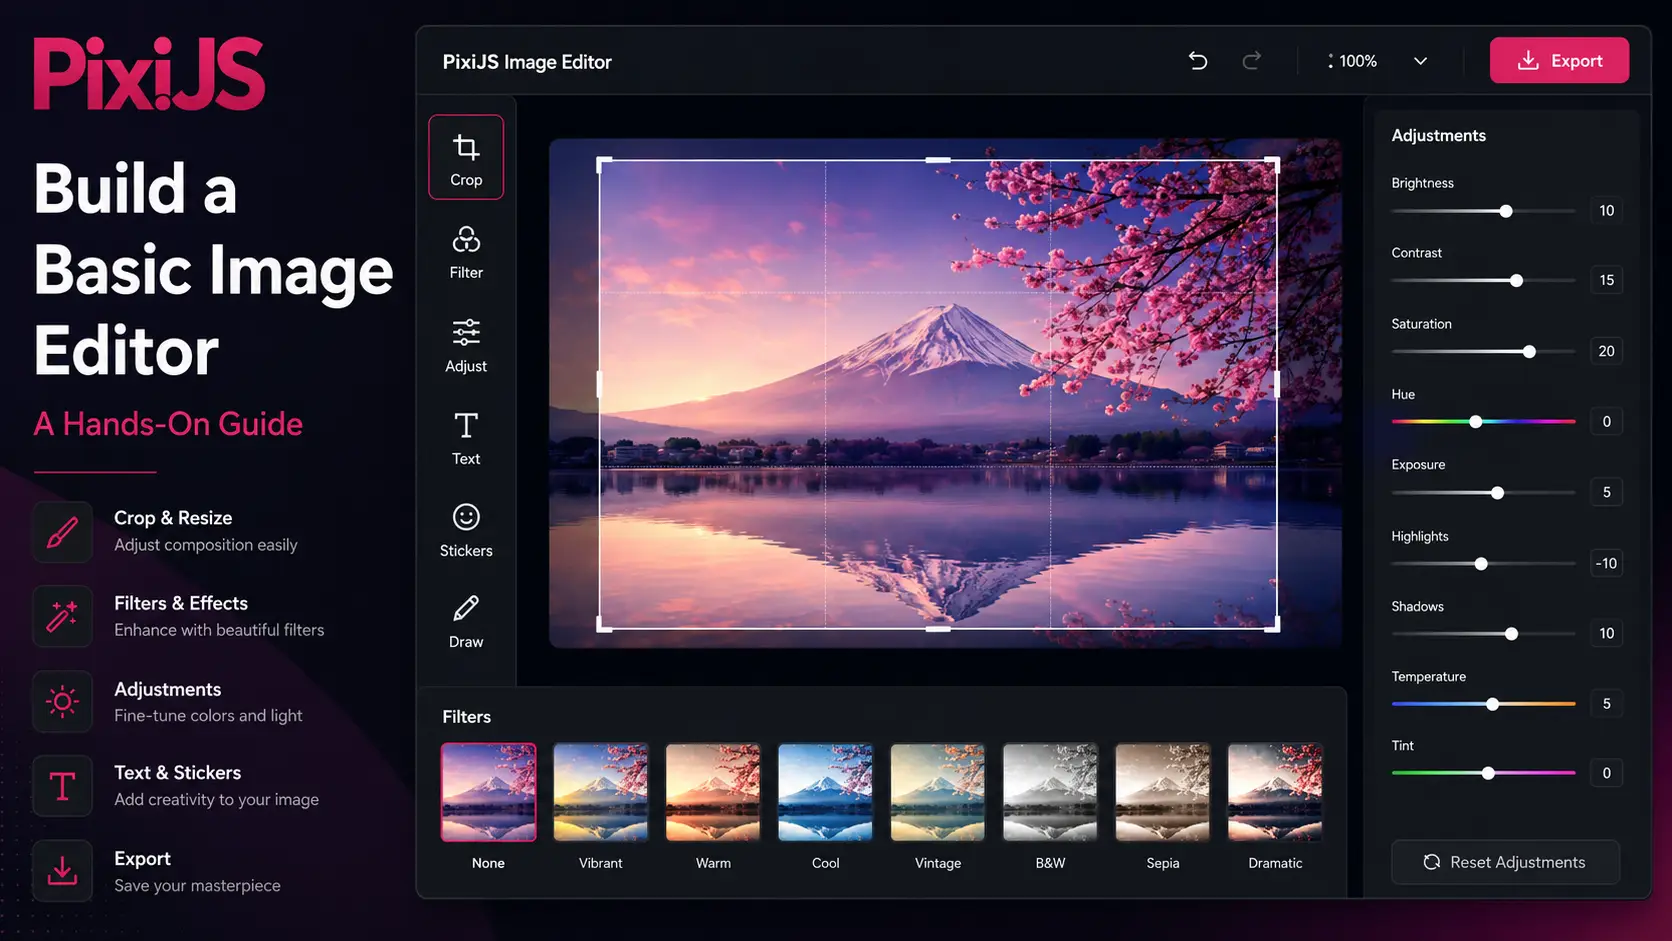
Project: complete image editor
This final project combines everything you learned into a complete image editor with a polished dark UI, full adjustment panel, and all the features covered in this tutorial. Click the button below to download the full working editor — open it in your browser and start editing.
Download Full Image EditorThe editor includes brightness, contrast, saturation, and hue sliders, blur and rotation controls, horizontal and vertical flip, interactive crop with rule-of-thirds overlay, filter presets (vibrant, warm, cool, vintage, black & white, sepia, dramatic), text and sticker overlays, a drawing tool, drag-and-drop image loading, file picker, undo/redo with keyboard shortcuts (Ctrl+Z / Ctrl+Shift+Z), and PNG export. The dark sidebar layout keeps controls accessible while the canvas takes up the remaining space. Every slider change is saved to the history stack for undo support.
Conclusion
PixiJS gives you WebGL-powered rendering with a clean, object-oriented API. The pattern you learned here — create an Application, load textures into Sprites, apply filters, and export with renderer.extract — is the foundation for any PixiJS image processing project. For more advanced features like layers, custom GLSL shaders, animation, and multi-pass effects, see our other PixiJS tutorials on performance optimization and custom filters. The key habit is to profile your filter stack: every filter is an extra GPU render pass, and the difference between smooth and choppy performance is usually filter discipline. Use the simplest filter that achieves your goal, bake static effects to textures when possible, and always test on mobile devices where GPU power is limited.