Magazine-cover retouching looks different from Instagram filtering in a way that is easy to see but hard to articulate. The skin has dimension. The pores are still there. The lighting has not been flattened. Behind that difference are three techniques that have defined high-end retouching since the 1990s: frequency separation, dodge and burn, and selective skin smoothing. None of them are new, but the tooling has gotten better and the techniques have been democratized by YouTube. The problem is that most tutorials teach the steps without explaining the math, so when something goes wrong — and it always does — you have no idea why. This guide is the version I wish I had read in 2012, when I was following action downloads and wondering why my retouching looked waxy. We will cover the underlying math, the specific brush settings that actually matter, where AI retouching tools still fall short, and a repeatable workflow you can apply to any portrait.
Frequency separation: the math behind the technique
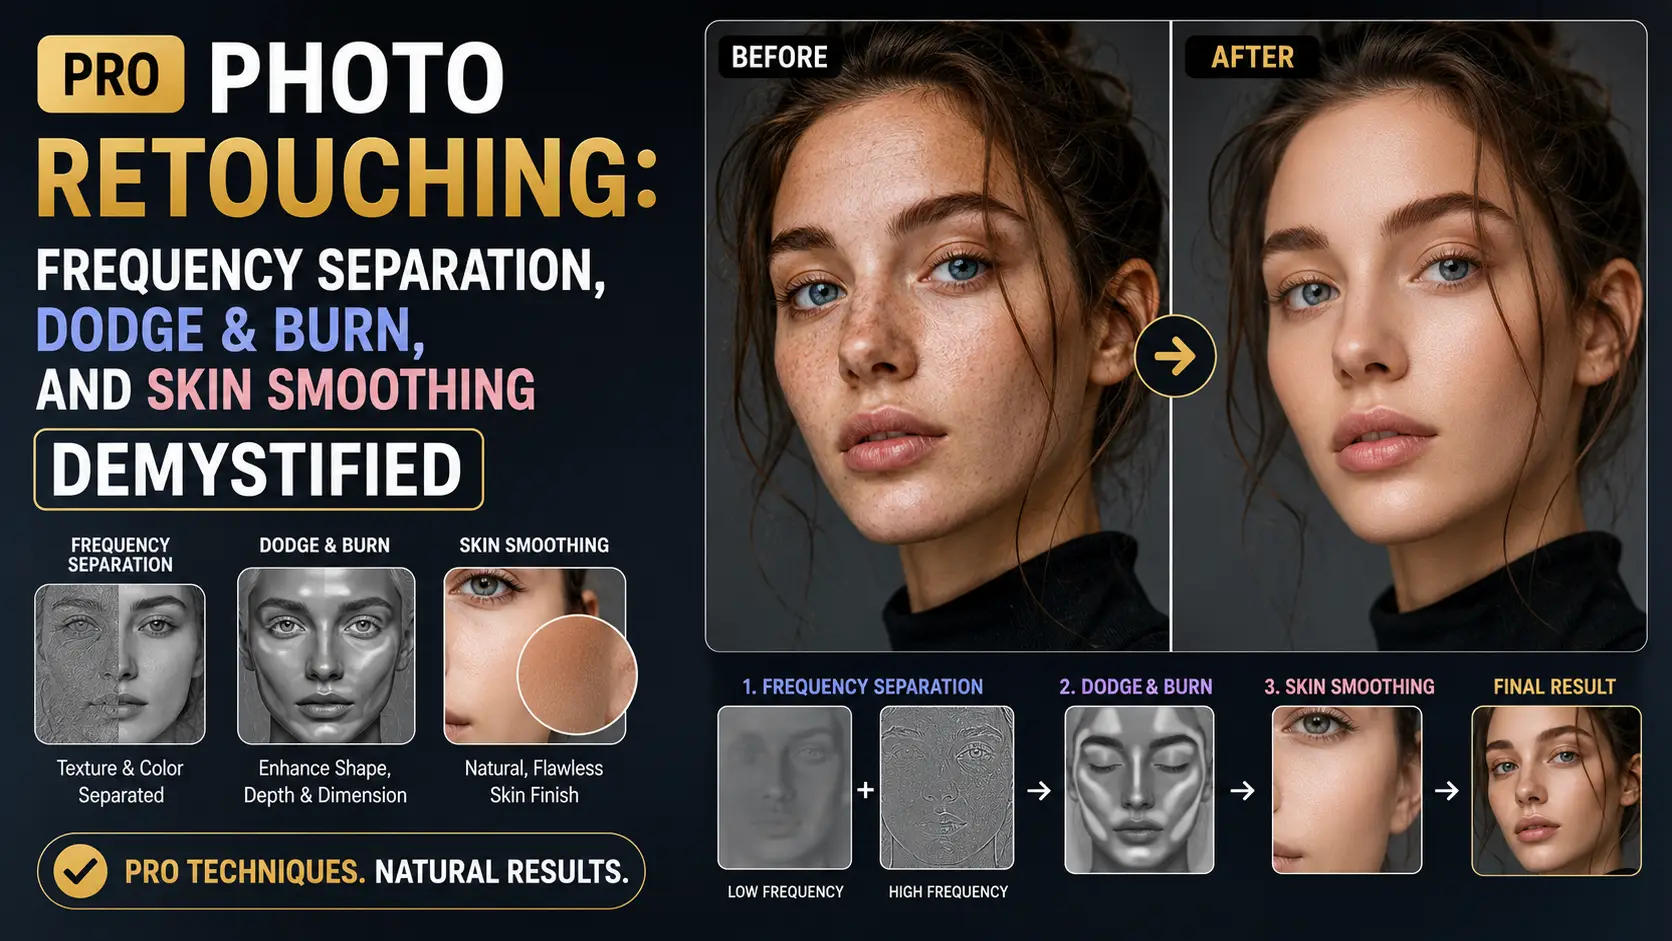
Frequency separation is based on a simple observation: any image can be decomposed into a low-frequency component (broad color and tonal information) and a high-frequency component (fine detail and texture). Add them back together and you get the original image. The trick is that you can edit them independently. Edit the low-frequency layer to fix color casts and uneven skin tone without touching pores. Edit the high-frequency layer to clean up blemishes without affecting color. This is what makes frequency-separation retouching look natural where blur-based skin smoothing looks plastic. The standard decomposition uses a Gaussian blur to extract the low-frequency layer. Apply a Gaussian blur with a radius appropriate to the skin texture scale — typically 4 to 12 pixels for a 24-megapixel portrait. Smaller radius preserves medium-frequency detail (which you usually want to keep separate); larger radius bleeds too much texture into the low layer. The right radius is the smallest one at which individual pores disappear from the blurred layer. The high-frequency layer is computed as the original minus the blurred version. In Photoshop, this is done with Apply Image (or on a duplicate layer, with the blending mode set to Subtract, then offset by 128). In GIMP, use the Filters > Generic > Convolution Matrix with a custom kernel, or use the GEGL operation. The math, simplified: high = original - low. The reconstruction is simply low + high = original. There is a 16-bit gotcha that almost every tutorial skips. Photoshop's Apply Image with Subtract blending assumes an 8-bit working space. In 16-bit, you need to use Linear Light blend mode on the high layer with the low layer below it, and the math works out correctly. If you do it wrong, you get a visible gray shift on the high layer. This is the single most common reason frequency separation looks wrong in beginner tutorials. Radius choice is the second most common failure mode. Too small a radius and the low-frequency layer still contains blemishes, defeating the purpose. Too large a radius and broad facial features bleed into the high-frequency layer, making skin texture edits affect overall shape. For a 24-megapixel portrait shot at 100 ISO on a full-frame sensor, 8 pixels is a good starting radius. For 50-megapixel medium format, 12 pixels. For an 8-megapixel phone photo, 3 pixels. Always check at 100% zoom — pores should be invisible in the low layer and visible in the high layer. An alternative decomposition uses the Median filter instead of Gaussian blur. Median is better at preserving edges in the low layer, which means less halowing around eyes and lips. The trade-off is that median is computationally expensive and produces a slightly different high layer that responds differently to cloning. Most professional retouchers use Gaussian for the broad pass and median for a second, finer pass on specific problem areas.
Dodge and burn: 100 years of darkroom technique in a digital brush
Dodge and burn predates digital photography by half a century. In the wet darkroom, dodging meant holding back light from a specific area of the print during exposure (making it lighter), and burning meant adding more light to a specific area (making it darker). Ansel Adams used these techniques extensively — his Moonrise over Hernandez print exists in dozens of versions, each dodged and burned differently to emphasize different parts of the scene. Digital dodge and burn is conceptually identical but mechanically different. The standard setup is a 50% gray layer set to Soft Light or Overlay blend mode, painted onto with a soft brush at very low opacity. Painting white on the gray layer dodges (lightens) the underlying image; painting black burns (darkens). Soft Light is gentler than Overlay and is the better default for portraits. Overlay is more aggressive and better for landscapes where you want stronger contrast changes. The brush settings that actually matter: 1-3% exposure (not opacity — exposure builds up gradually with each pass, opacity does not), soft brush (0% hardness), spacing at 1% for smooth strokes, and size approximately the area you want to affect. Most beginners use too high an opacity (10% or more) and end up with visible bands where the brush strokes overlap. The correct metaphor is building up tone over 50 passes, not slapping it on in 5. There are three traditional passes of dodge and burn. The first is global, addressing overall shape: darkening shadows under the jaw, lightening the bridge of the nose, darkening the cheekbone hollows. The second is local, addressing specific contours: a blemish scar, an uneven patch of skin tone, a shadow under one eye that is darker than the other. The third is micro, addressing texture: individual pores that catch too much light, fine veins under the skin, small discolorations. Why AI dodge and burn tools still do not match manual work is a question of intention. AI tools like Retouch4me Dodge and Burn analyze the image and apply a generic contour enhancement. They do not know that this particular face has a slight asymmetry you want to preserve, or that this particular shadow is supposed to communicate mood. A human retoucher makes dozens of micro-decisions per minute based on the specific photograph. AI makes the same decisions on every photo. The result is retouching that looks correct in isolation but feels generic in context. A workflow tip: do dodge and burn on a separate layer for each pass (global, local, micro), and toggle visibility frequently to compare. If you cannot see a difference when toggling a layer, that layer is doing too little and should either be strengthened or deleted. Retouching layers that do not contribute are noise in your file.
Skin smoothing: five techniques compared
Skin smoothing is where most retouching goes wrong. The goal is to even out skin tone and reduce temporary blemishes without losing the texture that makes skin look like skin. There are five common techniques, each with trade-offs. Inverted high-pass is the cheapest and crudest. Duplicate the layer, apply High Pass filter with a 2-3 pixel radius, invert the result, set blend mode to Linear Light, reduce opacity to 50%, mask to skin areas. It works by canceling out fine high-frequency detail. The result is fast but tends to look plastic, especially on male skin with stronger pore structure. Useful for quick social media content, not for editorial. Frequency separation with median stack is the pro approach. The low-frequency layer contains the skin tone information you want to smooth. Apply a Median filter (or a stack of median-blurred layers) to the low layer to even out blotchiness while preserving overall shape. The high-frequency layer, which contains pore texture, is left alone. This gives you smooth color with intact texture — the holy grail of skin retouching. The catch is that it is slow and requires practice to get right. Bilateral filter is the GPU-friendly option. Bilateral filtering smooths within a color range while preserving edges, which makes it ideal for skin smoothing. Photoshop's Surface Blur is a bilateral filter. The settings that work for skin: radius 10-15, threshold 10-15. Too high a threshold and you lose the smoothing; too low and you blur across edges you want to preserve. Applied selectively with a mask, bilateral filtering gives you 80% of the frequency-separation result in 20% of the time. Portraiture by Imagenomic is the established plugin. It uses a neural network trained on professional retouching to do automatic skin smoothing. The result is consistently good and fast, but it has a signature look that experienced retouchers can spot. It also tends to over-smooth male skin and skin with strong pore structure, producing the plastic look that marks amateur retouching. The newest option is AI-based tools like Evoto and Retouch4me Skin. These use modern diffusion-based models that produce better texture preservation than Portraiture. They are fast, batch-friendly, and good for volume work. The limitation is the same as with AI dodge and burn: they apply a generic solution that does not account for the specific photograph. For a single hero image, manual frequency separation still wins. For a 500-image wedding deliverable, AI is the right tool. A useful comparison test: take the same portrait, retouch it with each of the five techniques at typical settings, then print all five versions at 8x10. The differences that are invisible on screen become obvious in print, and you will develop intuition for which technique is right for which subject.
Where AI retouching still falls short
AI retouching has gotten dramatically better in the last three years, but it still has specific failure modes that experienced retouchers know to look for. The most common is over-smoothing on darker skin tones. Training data for retouching models is overwhelmingly lighter skin, so the models learn lighter-skin pore structure as the default. On darker skin, this produces a waxy look that erases the rich subsurface scattering that gives darker skin its dimension. The fix is either manual retouching or AI with significantly reduced strength. The second failure mode is eye highlights. Real eyes have complex highlights from the catchlight (the reflection of the light source in the eye), secondary reflections from surrounding surfaces, and subtle color variations across the iris. AI tools tend to homogenize these, producing eyes that look correct in isolation but feel dead in context. For portrait work where eye contact matters, manual retouching of the eyes is non-negotiable. The third failure mode is hair flyaways. AI tools can remove stray hairs, but they struggle with the transition between hair and background, often producing halos or ghosting. Manual cloning with a soft brush, while tedious, produces cleaner results. For beauty close-ups where hair is a major compositional element, manual work is the only option. The fourth failure mode is skin texture consistency. Real skin has consistent pore structure across the face, with variations only at specific zones (nose, forehead, cheeks). AI tools can smooth a region but often leave visible seams where the smoothed region meets unsmoothed skin. Manual retouching with frequency separation does not have this problem because the texture layer is preserved uniformly. When to use AI: batch processing of social media content, wedding deliverables where volume justifies generic quality, e-commerce product shots where the model is interchangeable. When to avoid AI: editorial covers, beauty close-ups, fashion campaigns, actor headshots, anything where the retouching itself will be scrutinized. A reasonable workflow for serious work is to use AI for the boring parts (blemish removal, basic skin tone evenness, flyaway cleanup) and manual for the parts that matter (eyes, lips, contour dodge and burn, final color grade). This typically saves 60-70% of retouching time while preserving the quality that distinguishes professional work. The key is to be honest about which parts actually matter and not let the AI do them.
Retouching ethics and the uncanny valley
The technical capability to remove any blemish, smooth any skin, and reshape any feature creates an ethical question that every working retoucher faces: where do you stop? The default in commercial retouching for the last 30 years has been to push as far as the technology allows, producing the airbrushed look that has defined magazine covers since the 1990s. The backlash to that aesthetic — the body positivity movement, the demand for authenticity in influencer content, the regulatory pressure in France and Israel to label retouched images — has shifted the default in the last five years. The current professional consensus is more nuanced than either extreme. The uncanny valley is the practical guide. Coined by Masahiro Mori in 1970 for robotics, the uncanny valley describes the point at which a simulation of a human becomes almost-but-not-quite-right, producing revulsion in the viewer. Retouched portraits hit the uncanny valley when skin texture is too smooth, when eyes are too symmetric, when features are too geometrically perfect. The viewer cannot articulate what is wrong, but they know something is. The image reads as plastic, not as a person. The technical markers of uncanny-valley retouching are consistent across subjects. First, complete absence of pores: real skin has visible texture at any reasonable viewing distance, and removing it entirely produces a mannequin look. Second, perfectly symmetric eyes: real eyes have subtle asymmetries in iris size, catchlight position, and eyelid shape; eliminating these makes the face read as constructed. Third, uniform skin tone: real skin has natural variation — slight redness around the nose, slight darkness under the eyes, slight flushing on the cheeks — that smoothing destroys. Fourth, plastic lips: real lips have vertical lines and texture that catch light; over-smoothed lips look painted on. The ethical principle that has emerged in editorial retouching is to preserve character while removing distraction. A permanent mole is character; do not remove it. A temporary blemish is distraction; remove it. A natural skin texture is character; preserve it. A temporary redness from a hot room is distraction; reduce it. The line is not always clear — a subject's mole might be a source of insecurity they want removed — but the principle is to err on the side of preserving what makes the subject look like themselves. Practical policy for client work: have a conversation about retouching extent before starting. Show the subject a reference image at the level of retouching you propose. Some subjects want maximal retouching (commercial headshots for actors are still heavily retouched by industry convention). Some want minimal retouching (editorial portraits for publications like The New Yorker or The Atlantic are typically lightly retouched). Most want something in between. Document the agreed level and stick to it; do not retouch past the brief because you can. A specific note on body reshaping: liquify tools can change body shape arbitrarily, and the temptation to use them is strong. Current editorial standards discourage body reshaping beyond minor corrections (posture adjustment, slight asymmetry). Major reshaping — waist narrowing, leg lengthening, muscle enhancement — is increasingly seen as unethical and is being regulated in some jurisdictions. If a client requests major reshaping, document the request in writing and proceed only with explicit consent.
A repeatable retouching workflow
After ten years of retouching portraits, I have settled on a workflow that produces consistent results across subjects. It is not the only valid workflow, but it is repeatable, and repeatability is what matters for professional work. Step 1: Cleanup pass. On a separate layer, use the Spot Healing Brush and Clone Stamp to remove temporary blemishes (acne, stray hairs, scratches). Do not touch permanent features (moles, scars the subject wants kept). Work at 100% zoom, moving systematically from top to bottom. This pass should take 5-10 minutes for a typical portrait. Step 2: Frequency separation at 8 pixel radius (for 24MP). Low layer for color work, high layer for texture work. On the low layer, use a soft brush at 10% opacity to even out major skin tone variations — blotchy redness, yellow patches, under-eye darkness. Sample nearby skin tone with the Eyedropper and paint gently. Do not aim for perfection; aim for improvement. Step 3: Dodge and burn on a 50% gray Soft Light layer. Three passes: global contour (darkening jaw shadows, lightening nose bridge, darkening cheekbone hollows), local contour (specific shadows that need reduction), and micro (individual highlights that catch too much attention). Brush at 2% exposure, soft round, 0% hardness. This is the pass that takes the longest — typically 30-60 minutes for a hero image. Step 4: Optional skin smoothing on the low-frequency layer. If the subject's skin is uneven enough to need it, apply a gentle Surface Blur (radius 8, threshold 12) to the low layer, masked to skin areas, at 30-50% opacity. This evens tone without touching texture. Step 5: Color grade. This is where the image gets its final look. Curves for tonal contrast, Selective Color for hue shifts in specific ranges, Color Balance for overall warmth or coolness. The grade should be subtle — if you can see the grade at first glance, it is too strong. Step 6: Sharpening. High Pass filter at 1-2 pixel radius, blend mode Linear Light, opacity 30-50%. Mask to eyes, lips, hair, and other important detail areas. Avoid sharpening skin — that re-introduces the blemishes you just removed. Step 7: Final inspection. Toggle the original layer on and off frequently. The retouched version should look like a better version of the original, not a different photograph. If toggling shows a dramatic change, you have over-retouched. Step back, reduce opacity on your retouching layers, and try again. Total time for this workflow on a hero portrait: 60-90 minutes. For social media content: 15-20 minutes (skip dodge and burn, use AI for skin smoothing). For volume work like weddings: 5 minutes per image (AI for everything, manual only for hero shots). The right workflow is the one that matches the deliverable.
Conclusion
The techniques behind magazine-cover retouching are not secret. Frequency separation, dodge and burn, and selective skin smoothing have been documented for decades. The reason most retouching still looks amateur is that the techniques are taught as recipes rather than as principles, so when something goes wrong — the radius is too large, the brush opacity is too high, the AI left a visible seam — the retoucher has no framework to diagnose the problem. Internalize the math (why a Gaussian blur extracts low-frequency information, why 1% exposure builds up tone gradually, why bilateral filtering preserves edges) and the techniques become adaptable to any subject. AI retouching is real and useful, but it is a labor-saving tool, not a replacement for intention. The retouchers who will keep working in 2030 are the ones who understand the principles and use AI to skip the boring parts.